Cold hands kill control fast. When your fingers get numb, throttle precision drops and braking feel gets sloppy. The best heated motorcycle grips solve that problem with steady heat, secure grip texture, and reliable wiring that does not fail in winter weather.
If you are building a full cold-weather setup, start with the main heated motorcycle gear guide, then compare the heated motorcycle gloves guide and the heated motorcycle jacket liners guide for upper-body heat management.
Jump Ahead To:
Quick Picks
- Best Overall: 12V Heated Grip Wraps
- Budget Pick: BikeMaster Heated Grips 7/8 120mm
- Premium Pick: KEMIMOTO Heated Grip Pads
- Best for Daily Riding: OXWIND 12V Heated Grips Cover
- Best for Touring: NTHREEAUTO Universal 7/8 Heated Grips
- Best for Cold Weather: Anauto Heated Grips for Motorcycle 7/8
Best Overall
Budget Pick
Premium Pick
Best for Daily Riding
Best for Touring
Best for Cold Weather
Comparison Table
| Product | Best For | Heat Control | Install Style | Main Tradeoff |
|---|---|---|---|---|
| 12V Heated Grip Wraps | most riders | 3 levels | wrap-over existing grips | fit depends on your current grip diameter |
| BikeMaster Heated Grips 7/8 120mm | budget integrated grips | 5 levels | full grip replacement | install can be tight on some throttle tubes |
| KEMIMOTO Heated Grip Pads | premium wrap-style setup | 3 levels | wrap-over with bracket + tape | best fit is around specific 22mm bar applications |
| OXWIND 12V Heated Grips Cover | daily commuter winter use | 3 levels | wrap-over with independent switch | slightly bulkier grip feel than stock |
| NTHREEAUTO Universal 7/8 Heated Grips | long-distance rides | 4 levels | full grip replacement | more wiring effort than simple USB hand warmers |
| Anauto Heated Grips for Motorcycle 7/8 | deep-cold value use | adjustable range (50C to 70C stated) | full grip replacement | fit and long-term durability depend more on install quality |
Quick Decision Guide
Pick 12V Heated Grip Wraps if you want fast heat with minimal teardown and strong weather resistance. Pick BikeMaster if you want a full replacement grip with higher step-by-step temperature control and a cleaner integrated-grip finish.
Pick KEMIMOTO if you want a rugged wrap option with strong materials and fast warm-up. Pick OXWIND for daily commuting where simple switch control and washable wrap design are useful. Pick NTHREEAUTO for long rides if you want multiple heat levels with integrated replacement grips. Pick Anauto if you need the lowest-cost route to very hot winter grip output.
Best Heated Motorcycle Grips 2026
1 / 6
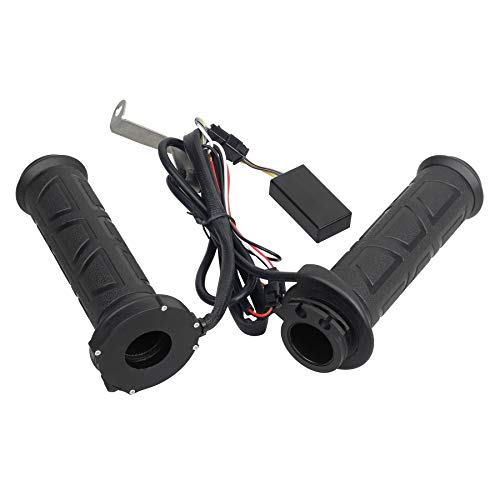
12V Heated Grip Wraps

Focus
Fast-heating 12V wrap grips for winter control
Comfort
3 heat levels with full-palm coverage
Use Case
Riders who want quick install over existing grips
Tradeoff
Requires correct grip diameter fit for best results
These wrap-style grips are the easiest way to add real heat without pulling your stock grips off. They are built around direct 12V power, warm quickly, and use a simple 3-level heat controller that is easy to operate with gloves on. For most riders, this setup gets you winter-ready with less installation risk.
On cold rides, the big win is heat response. The composite heating element ramps up fast and gives broad palm coverage rather than tiny hotspot zones. IP67 sealing and Kevlar-based outer material also make them better suited for rain and repeated cold-weather use than many soft wrap alternatives.
Why It Wins:
- Composite heating element warms the palm area quickly after startup.
- Wrap-over install lets you keep your current grips and throttle tube.
- IP67 sealing and Kevlar outer material handle rain and winter grime better than soft cloth wraps.
What You Give Up:
- Fit depends on your current grip outer diameter.
- Wrap style changes grip thickness slightly.
Bottom Line: This works well for riders who want strong heat without turning the install into a bigger project.
2 / 6
BikeMaster Heated Grips 7/8 120mm

Focus
Affordable full replacement heated grips
Comfort
5-level controller with faster heat structure
Use Case
Riders upgrading from stock grips on 12V bikes
Tradeoff
Can require extra effort on throttle tube fitment
BikeMaster is a classic replacement-grip approach instead of a wrap cover. That gives cleaner final appearance and more stock-like hand feel once installed correctly. The 5-step control range also gives more granularity than many 3-level systems.
The main challenge is install effort. Some bikes need throttle tube prep to seat the right grip cleanly, and fit can be tight during install. But once mounted right, these grips provide stable heat and good day-to-day winter control for the price.
Why It Wins:
- Replacement-grip format keeps bar feel closer to stock once installed.
- Five heat levels give finer changes than a basic high/low switch.
- Replacement-grip 12V heat avoids the extra thickness that wrap covers add over time.
What You Give Up:
- Installation can be more involved than wraps.
- Fitment work varies by motorcycle model.
Bottom Line: This makes sense for riders who want a cleaner integrated grip setup without paying much.
3 / 6
KEMIMOTO Heated Grip Pads

Focus
Durable premium wrap pads with rapid heat
Comfort
3-level control and fast 10-second class heating claim
Use Case
Riders who want higher build quality in wrap format
Tradeoff
Best compatibility is around specific 22mm applications
KEMIMOTO takes the wrap concept and upgrades material quality. The Kevlar-based shell, silicone grip print, and sealed construction make it feel more serious than many generic wrap pads. It is aimed at riders who want wrap convenience without cheap-feeling finish.
Performance-wise, it warms quickly and delivers consistent coverage across the palm area. The control system is simple and practical, and the pad design is easy to clean after wet or dirty rides. For riders who prioritize durability and winter grip confidence, this is a strong step up.
Why It Wins:
- Kevlar shell and silicone print hold grip better in wet gloves.
- Pad heats the palm area quickly instead of creating small hotspot patches.
- IP67 sealing gives the pad and wiring better rain tolerance in slush and spray.
What You Give Up:
- Not as universal as marketing suggests on every bar/grip combo.
- Higher price than basic wrap options.
Bottom Line: This suits riders who want a wrap-style setup with sturdier materials and better bad-weather confidence.
4 / 6
OXWIND 12V Heated Grips Cover

Focus
Commuter-friendly wrap covers with straightforward controls
Comfort
3-level heat with independent switch and washable design
Use Case
Daily winter commuting and short cold-weather trips
Tradeoff
Adds some grip bulk over stock feel
OXWIND is practical for riders who need predictable daily winter heat and do not want to rework their whole cockpit. The independent switch is easy to use, and the three-step control is enough for most commute conditions.
The waterproof construction and removable washable layout are useful for riders who deal with rain, road grime, and regular use. Heat output is solid for this class, and installation is simple if your bar size is in range. The only common compromise is added grip thickness.
Why It Wins:
- Independent switch is easy to reach on a daily commute.
- Washable, weather-resistant wrap format.
- Three-step heat is enough for repeated cold starts without a more complex controller.
What You Give Up:
- Slightly thicker feel than OEM grips.
- Wrap appearance is less clean than replacement grips.
Bottom Line: This works well for daily riders who want simple controls and low-hassle winter use.
5 / 6
NTHREEAUTO Universal 7/8 Heated Grips
Focus
Multi-level integrated heated grips for long routes
Comfort
4 selectable temperature levels with anti-slip texture
Use Case
Touring riders wanting full replacement grips
Tradeoff
Requires full grip swap and wiring time
NTHREEAUTO is a solid touring pick because the 4-step heat range gives more flexibility over changing elevations and weather during long days. The replacement-grip design also keeps bar feel cleaner than wraps once installed.
It is built for standard 7/8-inch bars and 12V systems, with textured rubber that stays grippy in cold gloves. Installation takes more effort than wrap-on products, but riders who wire it correctly get dependable heat and stable long-run comfort.
Why It Wins:
- Four heat levels let you adjust for elevation and temperature swings mid-route.
- Replacement-grip design keeps the bars cleaner than wrap covers.
- Textured rubber stays grippy when gloves are wet or cold.
What You Give Up:
- More install time and wiring effort.
- Less plug-and-play than wrap systems.
Bottom Line: This makes sense for touring riders who want an integrated grip setup with more heat-step flexibility.
6 / 6
Anauto Heated Grips for Motorcycle 7/8

Focus
Low-cost high-heat replacement grips
Comfort
Adjustable heat range with high max temperature claim
Use Case
Riders focused on maximum warmth for minimum cost
Tradeoff
Fit and long-term durability can vary with install quality
Anauto is the value-heavy option when you care most about heat output per dollar. It uses a replacement grip format and advertises a wide temperature band up to strong high-heat output, which can help in true deep-cold rides.
The tradeoff is consistency. Fit and long-term durability can vary more than top models, so installation quality and wiring discipline matter even more. If you are comfortable doing careful setup and testing, it can still be a useful winter budget option.
Why It Wins:
- High heat range helps when thick winter gloves still feel cold at the bars.
- Replacement-grip format keeps the throttle side cleaner than external wraps.
- Low price makes it one of the cheaper ways to add true 12V bar heat.
What You Give Up:
- Less long-term confidence data than leading picks.
- Requires careful install to avoid wire/stress issues.
Bottom Line: This is a practical low-cost route if you want high heat and are willing to install it carefully.
Use-Case Picks
Daily commuting
Go with OXWIND if you want easy controls and low-hassle wrap install for frequent short rides.
Touring and long rides
Go with NTHREEAUTO if you want integrated grips plus multiple heat steps for changing conditions.
Extreme cold and wet riding
Go with 12V Heated Grip Wraps for fast warm-up and weather-ready construction.
How to Choose Heated Motorcycle Grips
Start by choosing install style: wrap-over covers or full replacement grips. Wraps are easier and faster to install. Replacement grips look cleaner and often feel more OEM once fitted. If your full kit includes gloves and liners, map those together with the heated motorcycle gloves guide and the heated motorcycle jacket liners guide.
Then plan your power setup correctly. Heated grips are only as good as the wiring behind them. Most grip kits already include their own switch or built-in heat levels, so the main job is a clean fused install and sensible routing. Use the heated gear wiring guide when you are sorting the harness side, and use the broader heated gear controller guide only if your grips are becoming part of a larger multi-garment heated setup.
Finally, tune your system by ride type. Grip heat alone is rarely enough in hard winter conditions. Build layered warmth with the heated motorcycle vests guide, the heated pants liners guide, and the heated socks and insoles guide. For voltage-platform planning, compare the 12V vs 7V vs 5V heated gear guide.
Common Mistakes
- Buying grips before checking handlebar and grip-size compatibility.
- Wiring direct without fuse protection.
- Ignoring controller placement and glove usability.
- Expecting grips alone to solve full-body winter cold.
- Overtightening or stressing cables near throttle movement.
Frequently Asked Questions
Are heated motorcycle grips better than heated gloves?
Heated grips warm palms very well, but heated gloves warm the full hand more evenly in deep cold.
Do wrap-style heated grips work as well as replacement grips?
They can work very well, but they usually add some grip thickness.
Can heated grips drain my battery?
Yes, if wired poorly or left powered while parked. Use proper switching and fusing.
What bar size do most heated grips fit?
Most motorcycle options target 7/8-inch (22mm) bars, but grip outer diameter fit still matters.
Are heated grips waterproof?
Many are weather-resistant or IP-rated, but connector quality and install quality still matter.
Do I need a heated gear controller with grips?
Usually no. Most heated grips already have their own built-in switch or heat controller. A separate heated-gear controller only enters the picture when you are trying to integrate grips into a larger custom power-management plan.
What is better for touring: 3-level or 5-level heat control?
More levels can help fine-tune comfort on long rides with changing weather.
If your heated setup is still inconsistent, use the heated gear troubleshooting guide and the main heated motorcycle gear guide before replacing hardware.