
It’s a beautiful spring day and you pop into the garage to start your bike. You put the key in, turn the ignition, hit the starter switch – and nothing happens.
Maybe the engine turns a few times, but for some reason you can’t get your motorcycle roaring to life. While this could be a few different issues, the culprit is likely a dead battery.
In this post let’s take a look at how to charge a motorcycle battery to get your bike up and running as quickly as possible. This isn’t a hard task as long as you have the right tools.
Let’s jump into it!
Jump Ahead To:
How to Charge Your Motorcycle Battery
Step 1: Expect the Worst
Compared to your average car battery, small batteries like the kind you find in your motorcycle don’t like being fully discharged. It’s more of a problem when they’re fully discharged for an extended period of time.
It’s possible to revive a battery when it’s completely dead, but having fully died can result in permanent damage. You’ll probably need to buy a new motorcycle battery if yours is completely drained, even after trying this motorbike battery charging method.
The drawback is that you’ll have to spend money buying the new battery. On the plus side, a new one will last you years of regular use as long as it’s properly maintained.
Step 2. Determine the Type of Battery You Have
It’s important to determine the type of battery you have to avoid charging it with the incorrect method. Different batteries are charged in different ways depending on their type.
Gel, absorbed glass mat (AGM), and lead acid batteries can all be charged using conventional methods. Any lithium-based batteries require a special charger depending on the manufacturer.
Step 3. Determine the Kind of Charger You Need
Once you know what kind of battery your motorcycle is using you can figure out the type of charger you need to revive it. Currently there are a few different types of battery chargers to choose from.
Trickle Charger
The easiest to use is a trickle charger. This style slowly charges your battery using AC power from a wall outlet, that’s converted into DC.
When the battery is full the power supply is turned off and your battery is ready to go. It’s important to keep an eye on the charging process. The charger needs to be removed once the battery is fully charged.
Battery Tender
The most effective type of charger is a battery tender. These are also known as “float chargers”.
Battery tenders are great because they turn off automatically once your battery is fully charged. They’re designed to be used when you don’t plan on riding for an extended period of time, such as the winter riding season.
This is a great piece of equipment that’s worth investing in as a motorcycle owner. Check out my post on how to use a battery tender for a more in-depth guide.
Smart Charger
The third most common type of charging device is a smart charger. These monitor the charging progress of your battery and provide different rates of charge to prevent damage or overcharging.
Some smart chargers even come with a “desulfation” mode. This setting is used to remove sulfur from the lead plates inside batteries through electrical pulses and varying voltages.
Unfortunately, smart chargers aren’t a great choice to use with lithium batteries. The lithium design is incompatible with the lead charging system and can’t cope with the voltage pulsing.
As always, refer to your owner’s manual or contact the battery manufacturer to determine the type of charger you can use.
Step 4. Remove the Battery From Your Motorcycle
Removing the battery from your motorcycle helps to isolate the electrical system. This will prevent any blown fuses and melted wiring harnesses as well as protecting the ECU from frying.
Overcharging your battery can send an electrical spike through the motorcycle electric system. This could result in permanent damage and an expensive trip to your local mechanic.
Removing the battery from a motorcycle is a simple process. This will save you from running into worse issues than just a dead battery.
Another reason to remove the battery is because of the temperature change inside when it’s being charged. The charging creates a chemical reaction, which can give off heat.
Inside the battery, the solution could overheat which would cause acid bubbles to escape the casing. These chemicals will damage your motorcycle and eat away at the components inside.
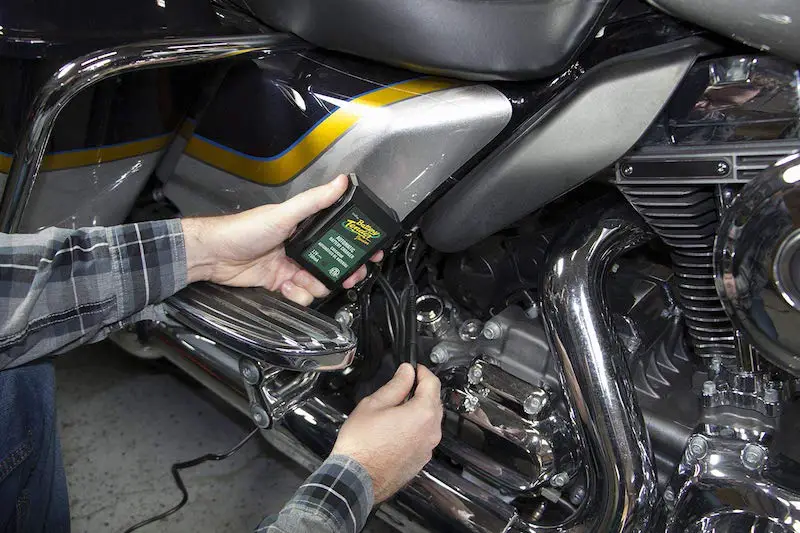
The only time it’s okay to leave the battery in your motorcycle is when you’re using a float charger. These chargers are designed to slowly charge the battery, safely.
Step 5. Charge Your Battery
At this point you’re finally ready to charge a motorcycle battery. When doing so, ensure that your bike is outside or in a well-ventilated area.
The reason for this is because batteries give off hydrogen gas when they’re being charged. This is a flammable gas and can be dangerous in enclosed quarters.
Overcharging a battery can result in hydrogen sulfide being produced. This is not something you want to be ingesting at any time.
The next step is to attach the charger to the battery terminals. It doesn’t matter what order you connect them in, just verify that they’re properly connected.
After connecting everything, plug the charger into the wall. Next, let the charger do its thing for a few hours before coming back to check on your battery.
Depending on the charger you’ll come back to a green light and battery that’s fully-charged. Alternatively, pop it back in your bike to see if your ride starts up.
If there still isn’t any charge and your bike isn’t starting, it’s probably time to replace your battery. Pick up a new one, try it out, and troubleshoot from there if you run into any problems.
Step 6. Re-Install the Battery
With the green light on you’re fully charged and ready to go. Unplug the charger from the wall, disconnect the terminals, and reinstall your motorbike battery.
Attach the positive cable terminal, then attach the negative terminal. It’s important to do it in this order to avoid shorting or damaging the electrical system.
Hopefully your bike starts back up and you can head out on a scenic ride.
If not, continue to the next step.
Step 7. Troubleshooting a Dead Motorcycle Battery
If your motorcycle didn’t start after sitting unused over the winter, it’s likely the charging system isn’t working properly. The same goes for if you’re using a 5+ year old battery in your bike.
If you’re using a relatively new battery, or if it just died on you randomly, there might be a problem with your charging system. You could also be dealing with an electric draw you’re not aware of coming from any accessories, such as heated grips you may have installed.
Never hesitate to bring your bike to the local motorcycle mechanic if you’re running into problems you can’t solve on your own.
Otherwise, you should be ready to go and head out for your next ride!